Monday, February 27, 2012

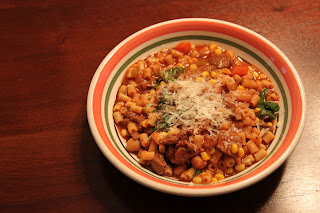
Accidentally Stew


Using a recipe as a guide is a good thing to be able to do.  That way, you can tailor things to the way you like them, substitute ingredients, change it up a little.  I never ever used to be able to do that, as I've discussed here before.  Back in the day, I would follow recipes exactly as written.  Sometimes, this would work out for me, sometimes not.  As I got more confident in the kitchen, I was more willing to experiment a little, and change recipes to suit my family's tastes.  Good, right?

But yesterday, I got cocky.

You see, we were having a little hootenanny, and I wanted to get something in the slow cooker so that when everyone left, dinner would be ready.  Kev found a slow-cooked minestrone recipe in the Wegman's magazine.  It got great reviews, and looked really good and easy.  So I decided to use it as a guide and make a few little changes.  For example, I didn't want to get the plastic bag of pre-cut  veggies, so I got some carrots, celery, garlic, and an onion, and chopped them up myself.  I also don't like diced tomatoes, so I left those out.  Instead of Wegman's Italian tomato sauce, I used Hunt's plain tomato sauce (the big can), and added basil and oregano, and salt and pepper for seasoning, and I added a couple tablespoons of tomato paste.  And just for fun, I added some corn, cut off the cob, when I added the garbanzo beans and pasta.

And that's when things went wrong.  I forgot to consult my "guide" when it was time to add the pasta, and instead of 1/2 cup, I let Daphne pour in the whole box.  Yep. The whole box. Probably at least 2 cups of pasta, maybe more.

When I went back to check on things, I was shocked to find a giant pot of minestrone STEW.  There was barely any liquid left at all.  I am proud to say I did not panic.  I added a can of beef stock and about a cup of water, and adjusted the seasoning. This helped a little, but it was still far from being soupy.  Live and learn.

The good news is, I like stew.  It was still really really tasty.  Just very ditalini-intensive. Daphne helped make it, which was fun, and she got a couple of points toward her next New Food Chart goal (still undetermined) for trying minestrone and garbanzo beans.  Kev really liked it too.  And we had so much that he took some to lunch today, I froze a bunch of it, and we still have enough for leftovers tomorrow.  In spite of my huge mistake,  things ended well.  Yay!

There it is.  Sort of like Gourmet Spaghetti-o's. 


So, here is the original recipe, below.  I recommend it highly.  If you don't have a Wegman's, you'll have to work around their prepared products in the ingredients list.  You can use my changes above, or do your own thing.  But I don't recommend using a whole box of pasta.

Wegman's Slow-Cooked Beef Minestrone


Ingredients:
1 pkg (about 1.6 lbs) Boneless Beef Chuck Roast, cut into 1-inch cubes  (I used stew meat)
Wegmans Pan Searing Flour  (I skipped this)
2 Tbsp Wegmans Pure Olive Oil
1 pkg (16 oz) Food You Feel Good About Cleaned & Cut Minestrone Soup Vegetables  (I chopped my own - onion, celery, carrots, garlic)
Salt and pepper 
1 carton (32 oz) Food You Feel Good About Beef Culinary Stock  (I used Swanson's)
1 can (14.5 oz) Wegmans Italian-Style Diced Tomatoes  (I skipped this too)
1 pkg (24 oz) Italian Classics Seasoned Tomato Sauce (Prepared Foods)  (I used plain Hunt's sauce, plus basil and oregano to season the soup)
1/2 cup dry Italian Classics Ditalini Soup Pasta  (um...oops.)
1 can (15.5 oz) Italian Classics Garbanzo Beans, drained and rinsed 
(I added corn cut off the cob)
1 pkg (6 oz) Food You Feel Good About Baby Spinach  ( I used regular spinach) 

Directions:
  1. Dust beef with pan-searing flour; pat off excess.
     
  2. Heat oil in large braising pan on MEDIUM-HIGH until oil faintly smokes. Add beef; sear 10 min until all sides are paper-bag brown.
     
  3. Transfer beef to slow cooker; don't discard pan drippings. Add vegetables to pan with beef drippings; season with salt and pepper. Cook, stirring, 3 min; add to slow cooker.
     
  4. Add stock, tomatoes, and sauce to slow cooker. Cover, cook 4 1/2-6 hours on HIGH or 8-10 hours on LOW.
      
  5. Add dry pasta and beans 30 minutes before end of cooking on HIGH (45 minutes before end of cooking on LOW).
     
  6. Add spinach to slow cooker; stir to blend well. Allow spinach to lightly wilt, about 2 min.

Wednesday, February 22, 2012

Food to Make You Feel Better

Mirepoix
Yesterday was Mardi Gras, and I had big plans for some shrimp and grits.  But Daphne woke up with a low fever, and plans were changed.  Since she was sick, she couldn't go to school (or piano lessons or Daisies), and I couldn't go to the grocery store to get my Cajun Dinner supplies.  Fortunately, I had a rotisserie chicken in the fridge that didn't get used over the weekend, so I was able to make chicken soup.

Daphne's favorite soup EVER is Daddy's Famous Chicken and Dumplings Soup.  This is delicious soup, but it involves roasting a chicken, making homemade broth, and making dumplings from scratch.  I did not make Daddy's Famous Chicken and Dumplings Soup.  I made Mommy's Cheater Chicken and Noodle Soup.  Much easier, and almost (but not quite) as good.  I highly recommend making this next time someone in your family is sick.  It will make them feel better.  It made me feel better, and I wasn't even sick.


Mommy's Cheater Chicken and Noodle Soup

Ingredients:

1-2 tbsp butter
1 tbsp olive oil
1 onion, chopped
2 or 3 stalks of celery, chopped*
4 or 5 carrots, chopped*
1 or 2 cloves of garlic, minced*
salt
pepper
dried thyme
48oz box of chicken stock, plus 2 cups water
Meat from 1 rotisserie chicken, skin removed, shredded into large pieces
About half a large bag of extra wide egg noodles

Directions:

Melt the butter with the olive oil in a large dutch oven.
Add the garlic, onion, celery, and carrots, add a little salt, and cook until softened, about 8-10 minutes.
Season with salt, pepper, and thyme to taste.
Add chicken stock and water, bring to a simmer, cover and simmer for an hour or so.
Add more liquid if needed, taste, and adjust seasoning.
Add chicken pieces and noodles to simmering soup, and cook for 8-10 more minutes until noodles are done.
Serve with your favorite crackers and a little black pepper if you want.

* these amounts are approximated.  Use as much or as little as you like.

Tuesday, February 21, 2012

Twenty Points

We are so proud of Daphne for trying twenty new foods so far in 2012.  She finally got the 20 points she needed to watch Star Wars!  So on Saturday, we had Family Star Wars Day to celebrate, complete with Princess Leia hair.

 In the morning, we tried the star fruit.  Nobody really liked it, but it counted towards Daphne's NEXT twenty points.  Not sure what her reward will be this time.  Empire Strikes Back, maybe?

Anyway, later in the afternoon, we had a late lunch and watched the movie.  There were Ham Solo sandwiches, Vader Tots (or perhaps Darth Taters...no one can agree on this), and baked Zuke Skywalker chips for lunch.


We also had home-made Wookies and Cream ice cream (vanilla with smashed up oreos) for dessert.  There are no photos because we were too busy eating it to take pictures.  It was delicious.

Daphne loved watching the movie, although I don't think she really understood all of it.  She wasn't freaked out by the sand-people like I was as a kid, but she was a little distraught about the whole battle between Obi-Wan and Darth Vader.  After the movie, we took a long LONG family walk to distract her crazy little  Daphne brain so she wouldn't be obsessing about Star Wars with a million questions at bedtime.  It worked!

The Star Wars portion of our weekend concluded on Sunday with some Princess Leia cinnamon rolls for breakfast.  I don't really have any recipes to share.  The cinnamon rolls were store-bought, the tots were frozen, and the sandwiches were sandwiches.  I did make the zucchini chips, but they weren't very good, and I'll probably try a different method next time.  And the ice cream was just the simple vanilla recipe that came with the ice cream maker, with some smashed oreos added at the end.  The fun part was coming up with the food ideas.  I hope she picks Empire Strikes Back for her next reward.  There might just be some Boba Fett-uccine in our future!

Wednesday, February 15, 2012

I Heart Brownies

Yesterday, Daphne and I had an after-school play date, so I wanted to have a Valentine treat handy.  Via the miracle of Pinterest, I found this recipe for Nutella Brownies, and that was that.  I lined the baking dish with parchment paper, hanging out the sides as "handles" so I could lift them out easily and cut them into hearts with a cookie cutter.
These brownies are very dense and chocolatey, which is great if you are like me and love chocolate.  I have to admit I did not taste the Nutella at all, but I loved these just the same.  I even had a little bit for breakfast today.  Don't tell Daphne.

Here's the recipe:

Nutella Brownies


You will need:
  • 2 cups bittersweet chocolate chips
  • 1/2 cup butter
  • 1/2 cup granulated sugar
  • 2 eggs
  • 1 teaspoon vanilla
  • 3/4 cup flour
  • 1/4 teaspoon salt
  • 1 cup nutella
  1. Preheat oven to 350 degrees. Grease and flour an 8 x 8 baking dish.
  2. Melt butter and 1 1/2 cups of bittersweet chocolate chips in a pan over low heat. Once melted remove from heat and let cool, about 10-15 minutes. (If you don’t let it cool, your brownies will be cakey instead of chewy.)
  3. In a bowl beat sugar, eggs and vanilla together. In another bowl mix flour and salt.
  4. Once the chocolate has cooled, mix it into the egg mixture. Then slowly add flour mixture and mix until combined. Fold in remaining chocolate chips and nutella. Batter will be thick.
  5. Spread brownie mix into baking dish. Bake for 35 – 45 minutes or until toothpick inserted comes out with a few crumbs on it. Allow to cool before cutting. Serve.

Tuesday, February 14, 2012

Valentine Ravioli!


Happy Valentine's Day.  As I type this, I have Butter Chicken in my slow cooker and Nutella Brownies in the oven.  There is a lot of love going on in my kitchen right now.  I'm looking forward to dinner.  But we also had a nice pre-Valentine's Day family dinner on Sunday.  Everyone pitched in, and we made mushroom ravioli.

Kev and I went out to dinner at Palio a couple of weeks ago, and I got some really good mushroom raviolis.  I've been wanting to make pasta lately, so I looked around on the internet and found a couple of mushroom filling recipes which I used as guides.  One thing I really wanted to do was copy how the restaurant sprinkled crumbled up amaretti cookies on top of the pasta.  It was a really nice touch.  It added a little texture and a little sweetness.  So, I went to Wegman's, where I have purchased amaretti cookies before, and - no cookies.  I looked all over town - Super Target, Giant, Safeway - no cookies.  So, I gave up on that idea, but that's OK.  The ravioli must go on.

So, Sunday morning, I made the filling.  Then, I made some pasta sheets while Kev and Daphne filled them.  I can't say enough good things about the KitchenAid pasta attachment and the Norpro ravioli maker.  Both are so easy and fun to use.  Daphne can almost do the ravioli maker by herself:


Aaah...the army of ravioli is complete:


Later that afternoon, when I ran out to Safeway on my final quest for cookies, THIS happened:


I came home from the store, and when Daphne heard me, she came running downstairs all dressed up, ready for a fancy dinner.  This was all her idea.  She got herself dressed and put clips in her own hair.  I love that kid.

Eventually, dinner was served.  Since there were no cookies, I toasted some pecans to sprinkle on top.  I also made a sage butter cream sauce that I am proud to say I made up all by myself without a recipe.  The Force was with me.

The pasta, filling, and sauce all got rave reviews from Kev, who said it was better than the restaurant.  I liked it too and was sad when I took my last bite (22 raviolis are in the freezer for another day, though...woohoo!).  Daphne really wanted to like it, but didn't.  The filling was mushy and there was cheese.  Not really her thing.  I didn't expect her to like it, but I am so proud of her for trying it without any battling or complaining whatsoever.  In fact, for tasting the ravioli, she got her 20th Star Wars point, and finally earned the privilege of watching Star Wars.  Next Saturday, we're having Family Star Wars day, which will include Star Wars themed foods, so stay tuned for that.


Below are recipes for the mushroom filling and sauce.  Follow the KitchenAid directions or your preferred method for making the fresh pasta, or use wanton wrappers and seal them with water (you can google how to do that if you haven't done it before).  Top with lots of freshly grated parmesan, toasted pecans (or amaretti cookie crumbs), and serve with a nice salad.  Yum.

Mushroom Ravioli Filling

Ingredients:

Mushrooms (I used one pint-sized container each of button, cremini, and shitake mushooms) thickly sliced or quartered
2 or 3 cloves of garlic, chopped
1/4 cup butter
1 Tbsp olive oil
salt
pepper
1/4 tsp onion powder
1/4 tsp garlic powder
2 Tbsp beef broth 
1 cup ricotta cheese
1/2 cup parmesan cheese (freshly grated if possible)


Directions:

Melt butter over medium heat and add olive oil.
Add mushrooms and saute, stirring occasionally, until they release their juices and the pan is no longer sort of all watery.  This takes several minutes.  Be patient.
Season with salt, pepper,  onion powder and garlic powder.
Add garlic and cook for about 30 seconds.
Add beef broth and let it reduce.
Set mushrooms aside to cool.
Add ricotta, parmesan, and cooled mushrooms to food processor and blend until smooth. (Or if you like the filling to have a little texture, don't blend as long).
Taste and season as needed.
Use mixture to fill pasta according to your preferred method ( I used my Norpro press).
Let pasta dry for about an hour before cooking, or freeze in a single layer.
This made 44 raviolis.


Sage Butter Cream Sauce

Ingredients:

1/4 cup butter
1/4 cup AP flour
dried sage
salt
pepper
about 1 1/2 cups chicken stock 
heavy cream
nutmeg

Directions:

Melt butter over medium heat.
Add flour and stir constantly, once combined, cook for a minute or two
Add chicken stock,  stirring constantly until combined and there are no lumps of flour, bring to a simmer to thicken
Season with sage, salt, and pepper to taste
Add 1/4 or 1/2 cup heavy cream (whatever you like). 
Taste and re-season as needed.  Warm through, but don't let it boil.
Grate some nutmeg - just a little - into the sauce and stir to combine.

Add to ravioli, top with toasted pecans (or crumbled amaretti cookies if you can find them) and freshly grated parmesan cheese,  and enjoy!
 

Monday, February 13, 2012

Time to Make Sauce


This weekend, I decided it was time to start teaching Daphne how to make her favorite thing:  Spaghetti and Meatballs. I already had some meatballs in the freezer from last time we had it, so we started with learning the sauce.  She was already in a groove from her cooking class at Wegman's earlier that day, and she had the perfect hat!  So, things went pretty smoothly.

We are a two-sauce family.  My mom's meat sauce is awesome for plain pasta and I'm hoping she will teach it to Daphne. But for meatballs, we make a smooth tomato sauce with mushrooms.  Kev taught me this one, so if you're reading this, you are being let in on one of his Top Secret Kev Recipes.  So, don't tell anybody.  Actually , it's not so much a recipe as it is a guide.  When he first showed me how to make it, I was not very fond of cooking and I was definitely not confident in the kitchen.  I wanted to know the EXACT amounts of things and the EXACT steps.  If you have a recipe, then you can blame the recipe if the food turns out crappy.  But if you're winging it and it's bad, it's all on you. WAY too much pressure.

I am happy to report that 10 years ( and hours and hours of Food Network shows) later, I am not quite as inflexible as I was then, and I am definitely more confident when I cook.  While Daphne and I were making the sauce, I was telling her that you have to season it, and taste it, and see what it needs, and season it again.  Kev had a good laugh when he heard that, remembering all the kitchen panic of days gone by- "But it doesn't say how MUCH oregano!"


Above, we were having a little lesson about salt.  I was telling Daphne not to go too crazy (she loves grinding the salt) because you can always add more, but you can't take it out once it's in there.  Last night, I was watching "Worst Cooks in America," and this poor guy poured a whole bottle of soy sauce into a stir fry he was making for Crazy Ann Burrell.  Good grief.  She refused to even taste it.  I like that show.  Compared to the people on there, I think I'm in pretty good shape in the kitchen.


Our sauce turned out good and Daphne was pretty proud of it.  And we have a LOT left, so we're making baked ziti tonight.  I love left-overs.


Below, is the basic idea for making the sauce.  Serve with your favorite meatballs, some pasta, lots of freshly grated parmesan, and a nice salad.  And make sure you have plenty of napkins handy.

Kev's Sauce

Ingredients:

Olive Oil
Mushrooms, sliced
Garlic, minced
Salt
Pepper
Oregano
Basil
Bay leaf
2 large cans of tomato puree
tomato paste
red wine
sugar

Directions:

Heat a couple tablespoons, maybe a little more than that, of olive oil in a dutch oven.  Add the mushrooms and cook until slightly softened.  Season with salt, basil, and oregano, add as much or as little garlic as you like (I like a lot) and continue to cook for about 30 seconds.  Add the tomato puree and about 2 tablespoons of the tomato paste.  Add some sugar to cut the acidity of the tomato (maybe not quite a quarter of a cup), and about a cup of good red wine.  Stir it all together, throw in a bay leaf, cover and simmer for a nice long time, maybe two hours or so.  Check the seasoning now and then.  Add salt if it's too sweet, add sugar if it's too acidic, add herbs if it's too bland, add wine if it's too thick.  You can add black pepper too, if you want.  Use the Force.  You can do it.  Trust me.  If I can do it, you can do it.

Friday, February 10, 2012

Atempted Breakfast

So, it's been pretty quiet in my kitchen this week.  I've been busy and tired, and I haven't done much cooking.  That's all about to change, though, because if all goes as planned, there will be mushroom ravioli for Sunday dinner.  Plus, I got my latest Cook's Illustrated yesterday, and was very inspired.  So stay tuned for all that.

Last weekend, my mom and dad and Jeff and Scout came over for breakfast to celebrate my dad's birthday.  We decided to make something new, and tried these breakfast biscuit muffin things I had seen on another blog.  They were really easy to make, and weren't terrible.  They were just kinda boring.  They needed something.  My mom said gravy.  You can't go wrong with gravy.  So, if I make these again, I will probably use a different kind of biscuit ( I used Pillsbury Grands), plus make some gravy to go with them.  I will put the original recipe below.  Warning:  these will overflow, so put your muffin tin on a cookie sheet to catch the mess.

Bacon, Egg & Cheese Biscuit Muffins
from Cooking with my Kid

Prep Time: 5 mins  Cooking Time: 20 to 25 mins
Ingredients:
1 package biscuit dough (10 biscuits)
3 eggs
3 tablespoons milk
1/3 cup of shredded cheddar
4 slices bacon (we used turkey bacon and veggie bacon)
salt and pepper
Cook the bacon in a pan or in the oven until it’s almost done. Chop into small bits and set aside. (Note: if using veggie bacon do not cook it ahead – simply defrosted it and chopped it up.) Preheat the oven to 400 degrees. Whisk together eggs and milk, a pinch of salt and some cracked pepper to taste and set aside. Meanwhile, roll out each biscuit until it’s slightly bigger than the circumference of your muffin tin. Grease the muffin tin with cooking spray and push one biscuit into each muffin cup being sure to push it all the way down and to the sides. Leave the ridge hanging over the edge. Divide the cheese evenly in each of the biscuit cups and then pour egg in, filling each cup only 1/2 way. They will look empty but resist the urge to top them off. You must account for the biscuits puffing up – otherwise you’ll have a mess on your hands. Sprinkle bacon atop of the egg and bake for 10 to 12 minutes or until biscuits are golden and eggs are set. Use a butter knife to loosen each muffin and serve warm.

Friday, February 3, 2012

No Sleep Salmon


Sometimes, I am cursed with Restless Brain Syndrome.  When this happens, it's never good.  I wake up in the middle of the night, my mind starts churning, and there is no OFF switch.  And that's what happened to me at 3:00am Wednesday.  I woke up and couldn't stop thinking about Girl Scout Valentine's crafts, no matter how hard I tried.  It was horrible.  Finally, at about 5:00, I just got up and watched TV.  There's not a whole lot worth watching on TV at 5:00am.  Luckily, I had recorded the latest New Girl from the night before, so I watched that.  Either that show is really getting funny, or I was just slap-happy from lack of sleep, but I laughed a lot.  Way to go, Zooey!

Unfortunately, Wednesday was grocery store day, and I had to think about a meal plan for the next few days.  Meal plans are hard for me, even when I'm thinking clearly.  Wednesday, I was NOT thinking clearly.  I needed easy meals.  I didn't have to worry about tonight (Friday) because it's First Friday which means dinner at the pub.  I decided on pancakes for last night (Thursday) because I had buttermilk that I needed to use.  So that just left Wednesday.  One day to plan.  I could do that.  So I started to think about it...

AHA!  Fish!  I would have Fish Night.  Fish Night is easy! Wegman's has these already prepared flounders that Daphne really likes.  Is it flounder?  Maybe it's cod.  Flounder or cod, I can't remember.  It's some sort of delightfully mild white fish that just has to be re-heated in the oven.  Anyway, that was the plan.  Fish, rice, and a salad.  Done.

So I went to Wegman's, got everything I needed, and headed to the already-prepared-fish area.  Guess what.  No flounder/cod.

No fish, no plan.

Panic began to set in. 

I had to use the Force again.  So I took a deep breath, looked around, and spied the salmon.  Crisis averted.  (Cue trumpets)

My good friend, who we call Miss B., is a great cook.  She made orange glazed salmon for us one night when she had a little Mommy Dinner Party, and was nice enough to share the recipe.  Good stuff.  And really easy.  Even a sleep-deprived zombie could make it, with a little help from her Kindergartener.

So, Daphne made the glaze and brushed it on the salmon (above), and she also made a nice salad (below):

Oh my gosh, I love my wooden salad bowl.

Meanwhile, I made some rice pilaf, and about 20 minutes later, we had a nice healthy and delicious dinner.

Thank you, Miss B.  
Recipe below.


Miss B's Salmon with Orange Marmalade

Ingredients

1/4 cup marmalade (I actually use a little more than that)
2 Tbsp. soy sauce
2 garlic cloves, minced
1 1/2 lb salmon fillet
salt

Directions:

Preheat oven to 400 degrees.
Combine first 3 ingredients and whisk.
Place salmon on the rack of a broiler pan lined with foil and sprinkle with salt (I usually brush the foil with a little olive oil to prevent sticking).  Spread about half the marmalade mixture over fish.  Bake for 18 minutes or until fish flakes easily with a fork.  Remove from oven and spread remaining orange mixture over salmon.
Preheat broiler.
Broil fish 3 minutes or until topping browns.

Thursday, February 2, 2012

And Now for Something Completely Different

After all the savory cooking we've been doing around here, I decided it was time to bake something sweet.  Kev gave me and Daphne a copy of Williams Sonoma Cooking Together - a cook book for parents and kids - for Christmas last year, so we looked through that and chose "Lemony Berry Bars."  The recipes in the book are very kid-friendly, and there was a lot Daphne could do.  She made the crust (above), helped make the lemon filling (below):


And spread the jam on the crust when it was done baking:


This was not our most successful cooking adventure.  I'm not sure why.  We followed the recipe exactly, except we had to use an 8x8 pan instead of 9x9...I don't have a 9x9.  How much difference could one inch make?  Apparently, quite a bit.  We had to cook it at least 20 minutes beyond what the recipe said, and the lemon part still didn't quite set. 


Oh well.  It wasn't very pretty, but it tasted good.


Actually, it was a little on the too sweet side for me, but Kev and Daphne liked it a lot.  I'd rather have a nice brownie.  Maybe next time.

The original recipe is below, but honestly you can probably find a better lemon bar recipe elsewhere on the internet.  Still, it was easy and fun to make with a kid, and if you like super sweet lemony desserts, this might be for you.  Just make sure you have a 9x9 pan.

Lemony Berry Bars
from Williams Sonoma "Cooking Together."

Ingredients

1/2 c. butter (1 stick), softened
1 c. plus 4 Tbsp all-purpose flour
1/4 c. confectioners' sugar
1 Tbsp ice water
1 tsp. vanilla extract
3/4 tsp. salt
3/4 raspberry or other berry jam
6 large eggs
2 cups granulated sugar
3/4 cup lemon juice
3/4 tsp baking powder

Directions:


Preheat oven to 350.  Grease a 9x9" pan.

Crust:  Beat the butter with an electric mixer until creamy.  On low, add 1 cup flour, confectioners' sugar, ice water, and vanilla, and 1/2 tsp of the salt and beat just until the mixture forms a ball.  Scoop the dough into the prepared pan and press to form an even layer over the bottom of the pan.  Refrigerate for 10 minutes.  Bake the crust until golden and firm, about 15 minutes.  Let cool completely on rack.  Lower oven temperature to 325.

When the crust is cool, spread the jam evenly over it.

In a bowl, combine the eggs, granulated sugar, lemon juice,  the 4 Tbsp flour, baking powder, and the remaining 1/4 tsp. salt.  Whisk until smooth.  Pour the egg mixture over the crust, spreading it with a spatula to form an even layer.  Return to the oven and bake until the top is set, 20-25 minutes.  Let cool completely on rack.  Cut into bars and serve.