Tuesday, January 15, 2013

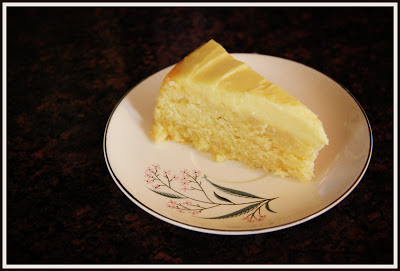
All Day Happy Cake


So, I'm in a book group.  I never really thought I'd be in a book group, but I am and I love it.  Being in a book group forces me to read more and to socialize with people I like.  Good things.  This month, it was my turn to host, and our meeting was last night.  Our assignment was to read The Happiness Project by Gretchen Rubin.  I had already read the book.  Twice.  I'm sure I even blogged about it.  It's a pretty good book.  There is a certain amount of obviousness and fluff, but it's good for people like me who need to be reminded that going on quiet log cabin-y vacations or eating lots of chocolate foods are not the only paths to happiness.  Being in a book group definitely makes me happy.

The book in the above photo is not a book group book, but a Christmas gift from Kev, who knows just exactly the kinds of things I like.  You should see all the photos in this book.  Total eye candy (or eye cake, I guess you could say) for people like me.  Very Anthropologie.  Since Christmas, I have been wanting to make one of the cakes from the book, and hosting the book group gave me the perfect excuse to do it.

There was great internal debate in the morning.  There were about a million other things I should have been doing.  Plus, it was laundry day, grocery shopping day, and I had an eye doctor appointment at 2:10.  Plus, the back part of the house really needed a good tidy-up, especially since guests were coming over.  But then I decided that this was the Happiness Project meeting, and baking a cake was a much happier endeavor than cleaning the back rooms, and that if I was organized and stopped sitting around fretting about the grocery store and just WENT to the grocery store, I could still have plenty of time for the cake and the laundry, and besides, the people in my book group aren't the kind of people who look down their noses at a messy playroom and would probably prefer that I bake them a cake anyway!  Decision made!

I got home from Wegmans, put on the Mumford and Sons Pandora station (there is almost never a thumbs down song on that station), and got to work on the custard.  Making custard seems scary, but it isn't.  It's actually really kind of fun.  Then, I figured I had JUST enough time to bake the cake before my eye doctor appointment.  And I did.  I pulled the cake out of the oven to cool, and ran out the door.  I made it with 5 minutes to spare.


When I got back, it was time to remove the cake from the pan to cool a little more, so I did that just in time to get outside and meet Daphne's bus.  Once I got her going on homework, I frosted the cake with the custard.  So pretty!!!


 Then, I put it in the fridge to set up.  Daphne and I might have eaten the extra custard.

An hour before book group, I took the cake out of the fridge to come to room temperature.  I put it on a cake stand, which made me happy; served it on my grandma's plates, which made me happy; and we used the nice crystal glasses that my parents gave us for our wedding, which also made me happy. 


The cake itself was really good.  Especially the cake part.  Really super moist and a nice flavor from the almond paste.  The custard was good too, but Kev and I both thought maybe the cake and custard were better separately than together.  They didn't seem to match.  Personally, I think this cake would have been better with a nice chocolate ganache, or maybe even just some vanilla whipped cream.  But Kev, who doesn't like cake, said the CAKE part was probably the best cake he's ever had.  And the book group seemed to enjoy it...their plates were clean.

The cake took all day to make, but I was happy that I decided to do it.  Looking forward to the next one.  I think I'll make the Goober Cake for my dad's birthday, so stay tuned for that!

Lemon and Almond Streamliner Cake
From Vintage Cakes, by Julie Richardson

Ingredients


Custard:
  • Grated zest of 2 lemons
  • 3/4 cup whole milk
  • 1/2 cup (3 1/2 ounces) sugar
  • 4 egg yolks
  • 1/2 tsp. fine sea salt
  • 2 Tbsp. cornstarch
  • 1/2 cup lemon juice (from approximately 3 lemons)
  • 1/2 cup (4 ounces) unsalted butter, cut into small cubes
Cake:
  • 1 1/4 cups (5 ounces) sifted cake flour
  • 1 1/2 tsp. baking powder
  • 1/2 tsp. sea salt
  • 3/4 cup (6 ounces) almond paste, ' 'at room temperature
  • 10 Tbsp. (5 ounces) unsalted butter, at room temperature
  • 2/3 cup (4 2/3 ounces) sugar
  • 3 Tbsp. canola oil
  • 2 tsp. pure vanilla extract
  • 3 eggs, at room temperature
  • 2/3 cup buttermilk, at room temperature

Directions


To make the lemon custard, combine the lemon zest, milk, and 1/4 cup of the sugar in a medium saucepan and heat over medium-low heat until just hot. Meanwhile, in a bowl, thoroughly whisk together the egg yolks, the remaining 1/4 cup of sugar, and the salt until well combined, then whisk in the cornstarch, then the lemon juice. Slowly whisk a third of the hot liquid into the yolk mixture. Pour the mixture back into the saucepan with the hot milk and cook over medium-low heat, whisking steadily, until the custard begins to thicken and bubble for 1 minute (you will need to stop whisking for a moment to check if it is bubbling). Strain the custard through a fine mesh sieve into a clean bowl and whisk in the butter until it has melted. Place a piece of plastic wrap directly upon the surface of the custard and place in the refrigerator to cool for about 2 hours. The custard is easiest to work with once it has set.

Center an oven rack and preheat the oven to 350°F; grease a 9- x 2-inch round cake pan and line the bottom with a parchment paper circle.

To make the cake, sift together the flour, baking powder, and salt in a bowl, then whisk the mixture to ensure that the ingredients are well mixed.

Using a stand mixer with the paddle attachment, combine the almond paste, butter, sugar, canola oil, and vanilla on low speed until blended; gradually increase the speed to high and cream until very light and fluffy, 5 to 7 minutes, stopping the mixer frequently to scrape the paddle and the sides of the bowl with a rubber spatula. Blend in the eggs one at a time, adding the next one as soon as the previous one has disappeared into the batter. With the mixer on low speed, add the flour mixture in three parts, alternating with the buttermilk in two parts, beginning and ending with the flour. After each addition, mix until just barely blended and stop and scrape the bowl. Stop the mixer before the last of the flour has been incorporated and complete the blending by hand with a rubber spatula to ensure you do not overbeat the batter.

Pour the batter into the prepared pan and spread it evenly. Rap the pan firmly on the counter to release any air bubbles. Place the pan in the center of the oven and bake until the cake is a deep golden color and a wooden skewer poked in the middle comes out just barely clean, 42 to 45 minutes. The cake might crack on the surface as it bakes; don't worry, this simply provides a way for the cake to soak up more of the lemon custard. Cool the cake in its pan on a wire rack for 30 minutes. Gently invert the cake onto the rack, leaving on the parchment paper until you assemble the cake. Flip the cake right side up and continue to cool the cake on the rack until it reaches room temperature.

To finish the cake, remove the parchment paper and place the cake right side up on a flat plate. Using a metal spatula, spread a thin layer of the lemon custard on the sides of the cake to seal the cake and give it a light shine. Put the rest of the lemon custard on top of the cake, spreading it just barely out to the edge. Use your spatula to make a swirly design in the custard on the top of the cake. Allow the assembled cake (or really, the lemon custard) to set in the refrigerator for 30 minutes.

Bring the cake to room temperature before serving (this will take about an hour). Any leftover cake keeps in an airtight container in the refrigerator for up to 3 days.

Friday, January 11, 2013

Sticky Business


I had always wanted to try making marshmallows, but never had the guts.   Then, my friend Jill told me a story about how she and a friend used to make them every year, but stopped doing it, and how she wanted to make some again,  but didn't want to do it by herself because it's kind of a big production.

A new tradition was born. 

Voila!  Marshmallows 2012!


She was right.  It IS a big production.  We were swirling around that kitchen like crazy people.  But it was really fun, and the marshmallows are pretty amazing.  So much better than the ones in the grocery store.  We made peppermint ones.  I have tons of them still, in the freezer, ready to pop into hot chocolate any time I want.

I roasted one over the flame on my stove the other day.  It was awesome.  There will be a mint chocolate s'more in my future.

So, thanks to Martha Stewart for this recipe, and thanks to my friend Jill for letting me come over for a day of marshmallow-making fun.  I think we should do another batch in the spring before we take the Daisies camping. All the other troops will be jealous.  Maybe we can even make homemade graham crackers too.  Because we are THAT mom. 


Martha Stewart Candy Cane Marshmallows

Ingredients

  • Vegetable-oil cooking spray
  • 2 cups sugar
  • 1 tablespoon light corn syrup
  • 4 packages (1/4 ounce each) unflavored gelatin
  • 3/4 teaspoon peppermint extract
  • 2 large egg whites
  • 2 teaspoons red food coloring

Directions

  1. Coat an 8-inch square pan with cooking spray; line bottom with parchment paper. Coat the parchment with cooking spray, and set pan aside. Put sugar, corn syrup, and 3/4 cup water in a small saucepan. Cook over medium heat, stirring, until sugar is dissolved. Stop stirring; let mixture come to a boil. Raise heat to medium-high; cook until mixture registers 260 degrees on a candy thermometer.
  2. Meanwhile, sprinkle gelatin over 3/4 cup water in a heatproof bowl; let stand 5 minutes to soften. Set the bowl with the gelatin mixture over a pan of simmering water; whisk constantly until gelatin is dissolved. Remove from heat, and stir in extract; set aside.
  3. Beat egg whites in the bowl of an electric
    mixer fitted with the whisk attachment
    until stiff (but not dry) peaks form.
    Whisk gelatin mixture into sugar mixture;
    with mixer running, gradually add
    to egg whites. Mix on high speed until
    very thick, 12 to 15 minutes.
  4. Pour mixture into lined pan. Working quickly, drop dots of red food coloring across surface of marshmallow. Using a toothpick, swirl food coloring into marshmallow to create a marbleized effect. Let marshmallow stand, uncovered, at room temperature until firm, at least 3 hours or overnight. Cut into squares.

Tuesday, January 8, 2013

God Bless You, Tyler Florence


Sometimes - not often, but sometimes - I will cook something, and when I take a bite of it, it's like Holy Crap!  I can't believe I made something that is THIS awesome!  Sorry for saying "crap."  I know this is a Family Blog.  But last night when I put a bite of Lemon Ricotta Pancake in my mouth, it was truly a Holy Crap moment.

I had just enough leftover DIY ricotta to make these Tyler Florence ricotta pancakes.  I didn't make the apple topping.  Instead, I used some blueberry syrup from a local farm that one of my neighbors recently gave me. It was a perfect combination.

There are several steps to making these pancakes, but it isn't hard at all so don't be tempted to skip any of them.  Don't be shy with the lemon zest. And use a good creamy ricotta like Bel Gioioso.  Or, make your own!

These will make your family happy.  They might even love you more.  Unless your family has a kid who refuses to eat cheese, or anything made with cheese even if you can't even notice that there is cheese in there at ALL.  (That kid got quickie Bisquick pancakes.  More ricotta ones for me and Kev!  Heck yeah!)


Here is the recipe.  Make them.  I'm not kidding.

Tyler Florence's Amazing Ricotta Pancakes:

  • 2 cups ricotta
  • 4 large eggs, separated
  • 1 cup buttermilk
  • 1 tablespoon lemon juice
  • 1 teaspoon lemon zest
  • 1 cup all-purpose flour
  • 3 tablespoons sugar
  • 1 teaspoon baking powder
  • Pinch salt
  • Butter, for cooking
  • Confectioners' sugar, for dusting, optional

Combine the ricotta, egg yolks, buttermilk, lemon juice, and lemon zest in a large mixing bowl. Sift the dry ingredients: flour, sugar, baking powder, and salt together into the ricotta mixture and stir until fully combined. In a separate bowl whisk the egg whites until stiff peaks form and then gently fold into the batter.
Heat a large nonstick pan over medium heat and add a little butter. Cook 2 to 3 pancakes at a time using a 6-ounce ladle or measuring cup to pour the batter into the pan. The trick to perfect round pancakes to carefully pour all the batter in the same spot and let it roll out to a complete circle. Cook the pancakes on 1 side until they set. When small bubbles appear on the uncooked surface, flip the pancakes and cook until golden on both sides, about 6 minutes. Keep the pancakes on a plate set at the back of the stove under a dry towel to keep warm while you make the rest.

Monday, January 7, 2013

Eating our Curds and Whey


One way to slow things down, if that is what you're trying to do, is to make your own cheese. I got this kit from Kev for Christmas, and couldn't wait to try it, so on Friday, I went to the health food store and got some organic pasteurized (but not ULTRA-pasteurized) milk, and on Saturday, we made homemade ricotta.

The process was simple.  You just add a little water and citric acid to the milk, add some cheese salt (note to self - find out how (if) cheese salt is different than regular salt), and heat up the milk slowly until the curds separate from the whey. (There are tons of recipes on line if you don't have a kit).

Curds and Whey
Then, you pour it in a cheese cloth to drain out the whey, and you are left with a beautiful, delicious ball of ricotta cheese.


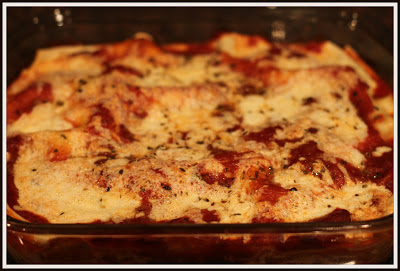
Which can then be made into a beautiful and delicious lasagna:

Heck yeah.
We had the lasagna last night for Sunday Dinner.  One of the few "jobs" that Daphne doesn't complain about is setting the table.  She really loves doing it.  So, last night, I asked her if she could get the table ready by passing out napkins and forks (she was extra happy to do this because she got me some pretty napkin rings for Christmas).  Kev had to go in to work for a little while yesterday, and had just gotten home and gone upstairs to shower while we got dinner on the table.  Suddenly,  Daphne dashed into the kitchen and asked if she could be the waitress.  "Um...OK,"  I said.  She switched into high gear.

"Mom!  Can you make me a menu?!  Mom!  Do we have any vases?!"

She put on an apron and got down to business.  I helped her make a menu (Daphne won't eat cheese, so I made her a separate little dish without it):


I helped her make a fancy centerpiece.  She remembered that she had a small jar of roses from a recent birthday tea party she attended, and we put to use my crafty bottle candle holders.  She put the seashell on because she said, "It will make me feel calm if I get nervous."


When Kevin came downstairs, to his surprise she welcomed him to the "restaurant," and led him to the table to look over the menu.  I sat down, and she asked us if we'd like to start with something to drink.  She was so professional!


Then she took our orders.  Kev was "Coustamar 1."  She even used short-hand...see the little arrows?  That was to show that we were splitting the Side of Grapes.  It was so dang cute and funny.  She would hurry into the kitchen, bring our food and drinks, then go back to the kitchen, take off the apron, and re-appear as Daphne.  When we needed the waitress, she would excuse herself to go to the restroom, go back into the kitchen, and put on the apron again.  It was like eating dinner with Clark Kent.  At the end of the meal, she disappeared into the kitchen again.  We heard scribbling, and she returned with the check (25 $)!  Kev handed over his credit card and gave her a $1.00 tip.  Best meal we've had in a LONG time.


The cheese we made was honestly really really delicious.  So fresh.  We had some on a cracker with a little bit of raspberry jam just to try it out and MAN it was good.  We have quite a bit left, so tonight for dinner we're having lemon ricotta pancakes. I'll let you know how they turn out.  Tomorrow, we're going back to that restaurant for some left-over lasagna.  Can't wait for that. 

Friday, January 4, 2013

Sometimes, Dinner Can Just be Cheese


Happy New Year!  I have resolved to get back to writing in this blog more regularly because I like it and I miss it.  Plus, I got two new cook books and an immersion blender and some DIY cheese for Christmas, so there you go.  Blog fodder.  But first, I wanted to show you the pretty new wooden board that Kev got me for Christmas, which I used last night for the first time.  We had cheese for dinner.  Cheese is a great dinner.  And it's easy and versatile.  I usually choose three types of cheese, and supplement the meal with a fruit (grapes, apple slices), a dip or spread (hummus, quince paste), a meat (last night we had some Wegmans chicken strips, sometimes, I just have ham or salami slices), and some bread and/or crackers.  Pretty and easy and delicious.  (By the way, brie + quince paste is awesome on a cracker or slice of bread.  Brie is also great with raspberry jam or honey.)  Dinner doesn't have to always be a big giant meal that takes all day to cook. Sometimes, it can just be cheese. 

PS.  Daphne said, "Dad! Go look at the board in the dining room!  It looks just like restaurant food!"